Ok quick recap! When we last left off, I needed to look into the software side of interfacing between my Arduino and my Android Phone. I needed to be able to assign keys in the SNES Emulator app, SNesoid, it looked like I needed to emulate a hardware keyboard. Theres an option for Bluetooth controllers in the app, but unfortunately its for devices that are identified as an input devices like keyboards. All I had was the modem so I needed to work around that.
After some digging around and finding some guys that had tried something similar but with actual Nintendo controllers, I had come up with a basic idea of what i needed to do. First, I had to get and install the Amarino Toolkit on my android phone. What Amarino does basically is receive data over the Bluetooth connection from my Arduino and present it to my Android phone as data it can use. Second I needed to take that data and use it to act like button presses on a keyboard. For this, I needed a keyboard app on my phone to take the data I was sending, read it, and press a button depending on what data it saw. Luckily for me a lot of this was already done and I just needed to modify it for my application.
The following files are needed before we continue if your following along. Get them from the Amarino Toolkit website.
Amarino - Android Application
Amarino Plug-in Bundle
MeetAndroid - Arduino Library
The Arduino side
Ok so I said I had found some guys that had already done a similar project using actual controllers. This Forum Post and this guy's code basically explains the output from the NES controller. How a NES controller communicates is by sending 8 bits of data (1 byte) to the console every button press and refreshing the information via a "heartbeat" timer every 16 milliseconds. Each bit relates to a button press on a NES Contoler as there were only 8 buttons. Up, Down, Left, Right, A, B, Start, and Select. That data was sent in a string and looked like the following:
01111111 = ANotice the "0", thats the bit being turned off to represent the button press. Alright now I have the format of the data I needed but the code in that forum post was no good to me because it relied on the controller to send the data already formatted and timed. I didn't have that so my Arduino would need to take care of that on its own. My Next problem was that I needed a SNES controller instead of the NES. Luckily, Nintendo didn't stray too far from the tree in that regard. Easier to do what you know right? The SNES controller was designed off the original NES but since it had four more buttons, the original 8 bit data couldnt handle it, so they bumped it to 16 bit.
10111111 = B
11011111 = Select
11101111 = Start
11110111 = Up
11111011 = Down
11111101 = Left
11111110 = Right
01111111 11111111 - B
10111111 11111111 - Y
11011111 11111111 - Select
11101111 11111111 - Start
11110111 11111111 - Up
11111011 11111111 - Down
11111101 11111111 - Left
11111110 11111111 - Right
11111111 01111111 - A
11111111 10111111 - X
11111111 11011111 - L
11111111 11101111 - R
Notice that there are four more bits that can be used, that never were on the official controller. I think they might have been left there for expansion, or for third party developers. But in reality, its more likely that its just cheaper and easier to do the 16 bit processing that computer devices were already being designed around instead of developing a whole system around 12 bit processing. Not to say it cant be done, but why not use what already being mass produced for the commercial market and save yourself the money. Plus it allowed for expansion and third party developers that you could make money off of without having to reinvent the wheel. Those four bits would come in handy for me as I ended up needing them for diagonal directions.
The next part was coding the Arduino. In my initial tests with the NES config, i was able to send char data and covert it to binary in the send command. But once i had two bytes of data, i couldn't do the conversion anymore. The way the meetAndroid library works it seems, is that for every send, its one line, and i needed to put two strings of data in one output. Or at least, thats what I thought. Then I realized, it didn't matter how I sent it, it was going to only be string data anyway because thats how the meetAndroid Library sends data. So I cut out the middle man and put my string in a variable, then sent the variable. This is what i came up with:
Note: dont load this code just yet...we still need to make one more change.
If you notice, theres actually 17 bits of data. This is because when expanding the Keyboard app code to except 16 different if else statements from the original 8, something went wrong and my string being sent for the letter "B" wasn't being accepted. I'm still not 100% sure why but I'm terribad at Java coding and don't understand the code very well. It works, thats all i'm saying. This code also doesn't have the Left and Right Shoulder buttons but using the data from the reference, it can be added with ease. Its already been setup in the keyboard app for the phone.
// Load the meetandroid Library
#include <MeetAndroid.h>
MeetAndroid meetAndroid;
// Store the Arduino pin associated with each input
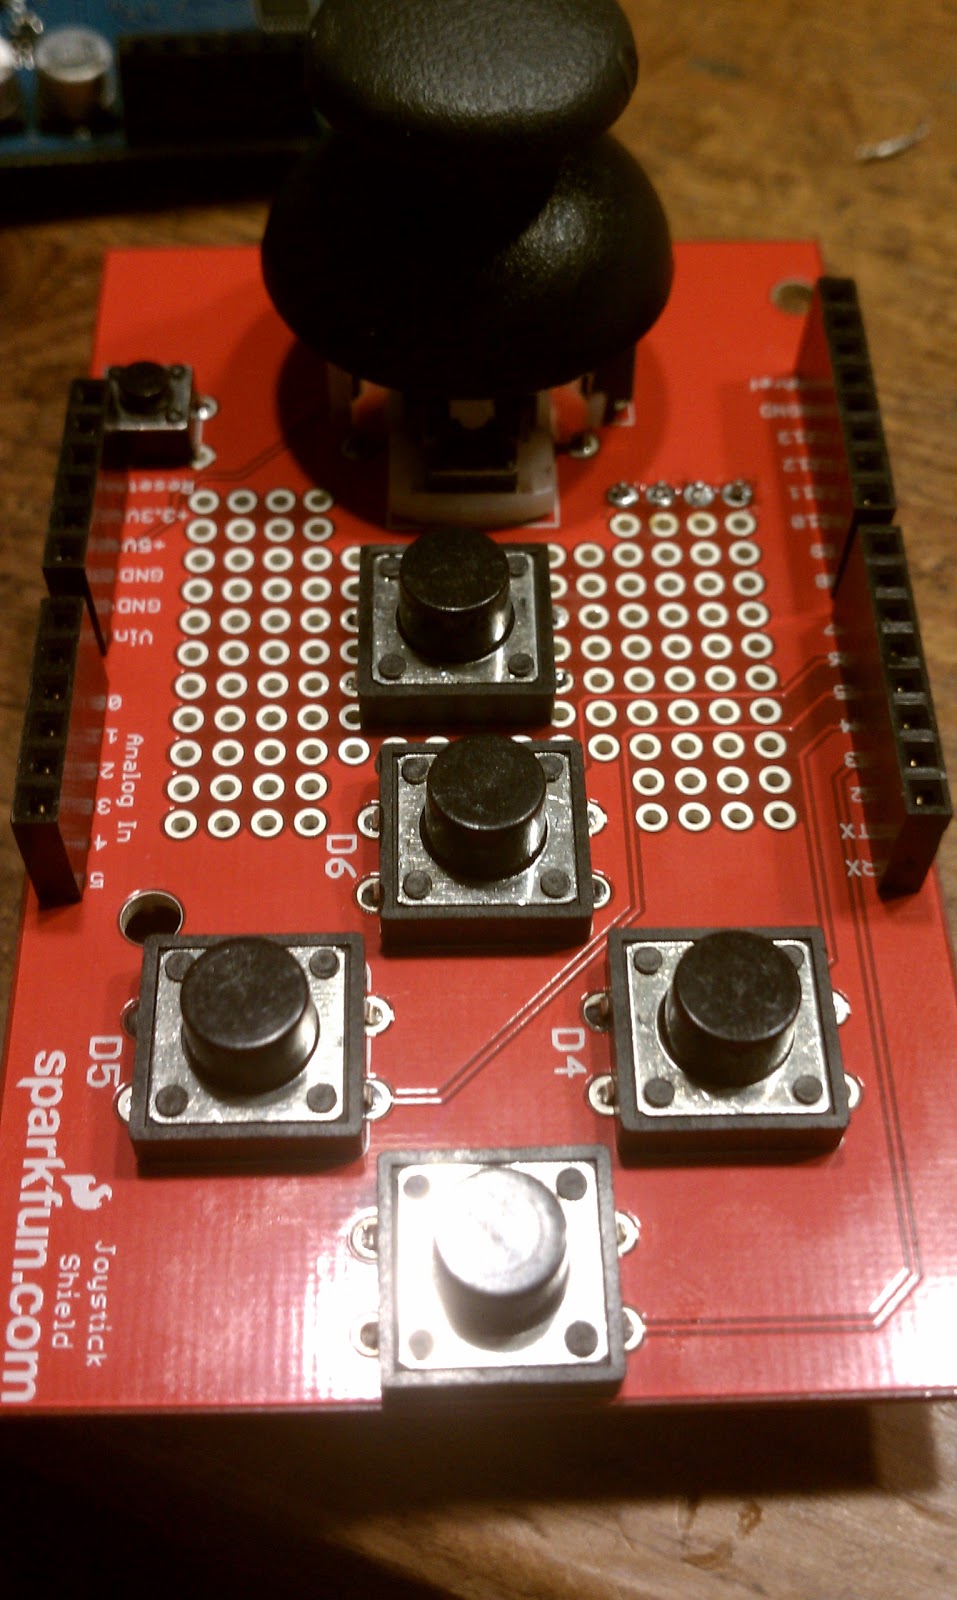
// Select button is triggered when joystick is pressed
int PIN_BUTTON_SELECT = 2;
int PIN_BUTTON_START = 7;
int PIN_BUTTON_A = 3;
int PIN_BUTTON_X = 4;
int PIN_BUTTON_B = 5;
int PIN_BUTTON_Y = 6;
int PIN_ANALOG_X = 0;
int PIN_ANALOG_Y = 1;
// creat intergers to store the state of each button press
int VAL_SELECT;
int VAL_START;
int VAL_A;
int VAL_X;
int VAL_B;
int VAL_Y;
int VAL_updown;
int VAL_leftright;
void setup() {
//start serial communications at 9600 baud rate
Serial.begin(9600);
// Initiate which pin is being read and internal pull-ups for that pin
pinMode(PIN_BUTTON_A, INPUT);
digitalWrite(PIN_BUTTON_A, HIGH);
pinMode(PIN_BUTTON_Y, INPUT);
digitalWrite(PIN_BUTTON_Y, HIGH);
pinMode(PIN_BUTTON_X, INPUT);
digitalWrite(PIN_BUTTON_X, HIGH);
pinMode(PIN_BUTTON_B, INPUT);
digitalWrite(PIN_BUTTON_B, HIGH);
pinMode(PIN_BUTTON_SELECT, INPUT);
digitalWrite(PIN_BUTTON_SELECT, HIGH);
pinMode(PIN_BUTTON_START, INPUT);
digitalWrite(PIN_BUTTON_START, HIGH);
}
// SNES Button Reference
// 01111111 11111111 - B
// 10111111 11111111 - Y
// 11011111 11111111 - Select
// 11101111 11111111 - Start
// 11110111 11111111 - Up
// 11111011 11111111 - Down
// 11111101 11111111 - Left
// 11111110 11111111 - Right
// 11111111 01111111 - A
// 11111111 10111111 - X
// 11111111 11011111 - L
// 11111111 11101111 - R
// My additions to it for this project
// 11111111 11110111 - Up Left
// 11111111 11111011 - UP Right
// 11111111 11111101 - Down Left
// 11111111 11111110 - Down Right
// NES Button Reference:
// UP = 11110111
// DOWN=11111011
// LEFT=11111101
// RIGHT=11111110
// SELECT=11011111
// START=11101111
// A=01111111
// B=10111111
void loop() {
// reads the current value of each digital pin
VAL_SELECT = digitalRead(PIN_BUTTON_SELECT);
VAL_START = digitalRead(PIN_BUTTON_START);
VAL_A = digitalRead(PIN_BUTTON_A);
VAL_B = digitalRead(PIN_BUTTON_B);
VAL_leftright = analogRead(PIN_ANALOG_X);
VAL_updown = analogRead(PIN_ANALOG_Y);
VAL_X = digitalRead(PIN_BUTTON_X);
VAL_Y = digitalRead(PIN_BUTTON_Y);
// start of the if/elseif/else chain to determin if the button is pressed and to send the string data to the Android Phone
if (VAL_SELECT == LOW)
{
char controller_select[] = "11101111111111111";
meetAndroid.send(controller_select);
}
else if (VAL_START == LOW)
{
char controller_start[] = "11110111111111111";
meetAndroid.send(controller_start);
}
else if (VAL_A == LOW)
{
char controller_a[] = "11111111101111111";
meetAndroid.send(controller_a);
}
else if (VAL_B == LOW)
{
char controller_b[] = "10111111111111111";
meetAndroid.send(controller_b);
}
else if (VAL_X == LOW)
{
char controller_x[] = "11111111110111111";
meetAndroid.send(controller_x);
}
else if (VAL_Y == LOW)
{
char controller_y[] = "11011111111111111";
meetAndroid.send(controller_y);
}
// this part checks joystick position and sends the string data based on if conditions are met
else if (VAL_leftright < 256 && VAL_updown > 256 && VAL_updown < 768)
{
char controller_left[] = "11111110111111111";
meetAndroid.send(controller_left);
}
else if (VAL_leftright > 728 && VAL_updown > 256 && VAL_updown < 768)
{
char controller_right[] = "11111111011111111";
meetAndroid.send(controller_right);
}
else if (VAL_updown > 768 && VAL_leftright > 256 && VAL_leftright <768)
{
char controller_up[] = "11111011111111111";
meetAndroid.send(controller_up);}
else if (VAL_updown < 256 && VAL_leftright > 256 && VAL_leftright < 768)
{
char controller_down[] = "11111101111111111";
meetAndroid.send(controller_down);
}
else if (VAL_leftright < 256 && VAL_updown > 768)
{
char controller_upleft[] = "1111111111110111";
meetAndroid.send(controller_upleft);
}
else if (VAL_leftright > 768 && VAL_updown > 768)
{
char controller_upright[] = "1111111111111011";
meetAndroid.send(controller_upright);
}
else if (VAL_leftright < 256 && VAL_updown < 256)
{
char controller_downleft[] = "1111111111111101";
meetAndroid.send(controller_downleft);
}
else if (VAL_leftright > 768 && VAL_updown < 256)
{
char controller_downright[] = "1111111111111110";
meetAndroid.send(controller_downright);
}
// Final string data to be sent. this says no buttons were pressed, do nothing.
else {
char controller_null[] = "11111111111111111";
meetAndroid.send(controller_null);
}
}
The last part I needed to do is change the baud rate on the Bluetooth to match my code. I had to slow it down to 9600 for two reasons. 1) the meetAndroid/Amarino app doesn't work well if you have you baud rate higher then 57600 and 2) the Arduino Uno SMD i was using apparently has a small issue that I was having intermittently running at 57600. So I just dropped it to 9600 since its a good safe speed. To change the baud rate on the Bluesmirf Bluetooth modem, you have to terminal into it. For this I just used the BlueTerm app on my phone i used earlier. Then i followed the following steps then loaded the sketch into my Arduino. Again, when uploading to the Arduino, don't connect the Bluetooth to the TX/RX pins. It wont work.
-Power up BlueSmirfThe Android side
-Make connection through your Terminal and get the green led
-Type "$$$" before 60 secs from the power up, and it should respond with "CMD" and the red LED will flash
-Type "H" -> list of commands
-Type "SU,9600" -> to change the baudrate and respond "AOK"
-Type "D" -> Display settings to see the new baudrate.
-Reboot the BlueSmirf to make the change happen.
Im not going to get long winded about the Android side because, to be honest, there's a lot I do not understand. Makes me really wish i would have tried harder when I was learning Java programing all those years ago. Ok so at this point, I installed the Amarino app and plugin bundle on my phone. You probably don't need the bundle but its got some neat stuff you can output with if you want to play later.
Now, this is where my knowledge got fuzzy. I wont copy/paste the code here because theres a lot of it and it would go on forever. But i will say that if you want to follow along, you'll need the Android SDK and Eclipse for the next part. The Android SDK is the developer tools for writing Android apps and Eclipse is the Java code writing app that the SDK has been linked up with. Both are free and opensource, which is awesome. Heres the modified Software keyboard for you to download that I modified from this guys. To open this project, unzip the file and import the existing project into the eclipse workspace. Then find the softkeyboard.java under the src folder. This is where all the programing takes place. The only thing i did, was expand the existing commands at the bottom from reading 8 different strings to 16 (nes to snes) and add the variables for the SNES buttons. Also, and this is important if you want to use the app for your own. You will need to change the following line to match your Bluetooth's mac address:
private static final String DEVICE_ADDRESS = "00:06:66:42:07:DD";This line is near the top of the code and should be easy to find. If you look toward the bottom, you'll also see how the code checks for where the "0" is in the string being sent, i think. I seriously had no idea what was really going on but it worked. I tried to just expand on what was there by following the original code and expanding the If/Else statements but I did have a problem with the first one and thats why I added the 17th bit on the Arduino side. It works, thats all I'm saying. Maybe one day i'll clean it up when I learn more about Android programing but for now, it will have to do. Once you made your Mac Address changes, export the program as a Android Application which will provide you with an APK file that you can copy to your phone's sdcard and instill.
Now to get the code to work, you'll have to follow the following steps. First, fire up Amarino and connect it to you Bluetooth. If everything working, you can launch the monitor and watch the commands being sent. Second, install the softkeyboard app and select it as an input method under your phones settings > language & keyboard settings. This gives you the option to switch your input method. Third, fire up a text editor like ColorNote, or even just a text message and hold your finder down on the text input area. A popup will show asking if you want to change your text input method. Change it to Sample Soft Keyboard and watch the top bar on you phone for the device to connect. Once thats done, you can can test the joystick by hitting the buttons and moving the joystick. If its worked up to this point, you'll start seeing text and numbers being typed out. Lastly, fire up SNesoid, and bind the buttons to the programs Input settings. You can now play Legend of Zelda! Huzzah!
Bugs and other stuff
So not everything is perfect, and this still needs work but it is playable. Not bad for a few days work going in blind. The biggest play issue I have right now is that the Joystick needs to be re-centered in order to move in different directions sometimes. I'm not really sure where thats coming from. It could be my baud rate, or my Arduino code, the code in my Keyboard, or even be the emulator. It looks good and smooth reading the data in the Amarino monitor but who knows. At this point though, I'm happy with what I've accomplished enough to put it down for a while until I learn some more about Arduino and Android programing.
The controller is still not 100% complete though. I need to get it in a housing to protect it while its in my back pocket as well as make it a little smaller. My idea of powering the joystick off the phone looks like it wont work but there are lithium ion battery packs that can be had and attached to a shield that easily attaches to the bottom of the joystick and can be charged over usb when needed. Also, theres versions of the Arduino like the Mini Pro thats the same size as the Bluetooth modem used in this kit, that can help shrink the footprint. I may end up doing that one day. Finally, theres the shoulder buttons. There are plenty of digital pins left that can be used easily. Just get a right angle header or two and attach two buttons to breakout boards, add the code to the Arduino sketch and your good to go. I've actually already programed the data into the softkeyboard app so its ready for the info. Well thats It for now, if you were trying to follow along and need help, leave me a message and i'll try to get back to you, otherwise, see you next project!
No comments:
Post a Comment