So I had a lot of bad luck building this project. The fault was my own though. I made a lot of stupid mistakes like shorting out the driver chips for the Nixie tubes and going though two Arduino mini's before getting a setup that worked. But i'll get into that later.

There were some really cool things about this project that I didn't really realize until I was holding them in my hand. Those things being the Nixie Tubes themselves and their history in the world. The early Nixie displays were made by a small vacuum tube manufacturer called Haydu Brothers Laboratories, and introduced in 1955 by Burroughs Corporation, who purchased Haydu and owned the name Nixie as a trademark. The name Nixie was derived by Burroughs from "NIX I", an abbreviation of "Numeric Indicator eXperimental No. 1." Similar devices that functioned in the same way were patented in the 1930s, and the first mass-produced display tubes were introduced in 1954 by National Union Co. under the brand name Inditron. However, their construction was cruder, their average lifetime was shorter, and they failed to find many applications due to their complex periphery. Nixie tubes were eventually replaced in the 1970s by light-emitting diodes (LEDs) and vacuum fluorescent displays (VFDs), often in the form of seven-segment displays.
The four tubes I receved from Ogi Lumen were made by the Soviet Union and are stamped CCCP.


They also have date codes printed on them. All four were made in 1986 in September and November of that year. I was 5 1/2 years old when they were made. Its kinda a weird feeling to be holding something that was technically "brand new" in the wrapper and made halfway around the world in a country that technically does not exist anymore. Thinking of the history that happened while it sat in storage. I mean, It would be another 5 years before the Soviet Union would collapse, they are older then the Space Shuttle Endeavour, and two of them were made the same time the New York Met last won the World Series. I don't know, I guess I'm a sucker for history, especially history I lived though.
Another neat part is the controller boards for the tubes that utilize Russian made K155NA1 Driver chips.
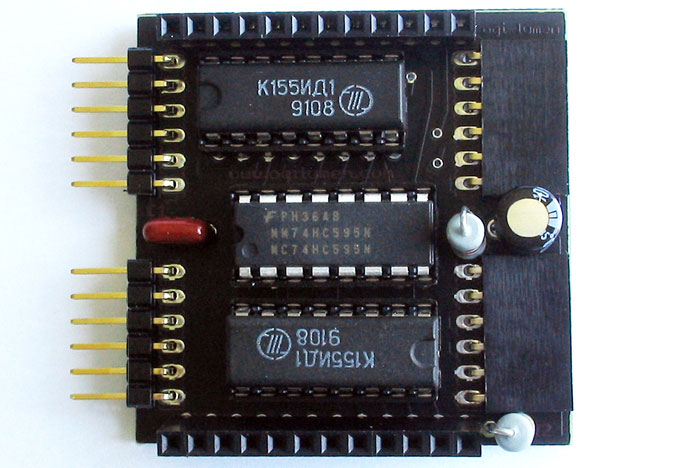
The ones in this picture are newer but two out of my original set were much older and definitely looked as if they were from the 70's or 80's. Unforgivably, they were both damaged, one permanently due to my negligence. I shorted one out on a random piece of wire that I had left on my worktable and the other I had flexed the pins too much and two of them broke. I was able to solder on new pins so it works but it was a regrettable mistake. Ohh well, ordered me up some replacements from the fine gentlemen over at Ardunix.
So wiring this project wasn't too big of a deal...in theory. I had wired up parts of it on my breadboard before I had my Arduino mini but I did run into a few problems with some of the parts I was using. First don't ever use radio shack perf boards unless you absolutely have to...They are junk!! I ran into my first issues with soldering the perf boards was that it was very difficult to solder since the solder doesn't stick to the PCB. But after screwing with my solder points I was able to make a custom sized board for my Arduino Mini that I thought looked really decent. Unfortunately, due to not really understanding how to regulate the 9v power supply to 5v properly, I over volted my first Arduino board and blew it up. Crap! Ohh well, order me up another and away I go. This time I used a radio shack perf board with copper contacts on them to help with my problem with the solder not sticking to the PCB. Still, it wasnt the best. The copper contacts were only on one side and only on the surface which didnt help much. Plus the contacts weren't evenly spaced really well and caused me to burn up another board when my solder points merged and shorted out the board. Crap!!! I did have it going though. The picture from my last post was using that board, but I tried adding the LED's after I took that picture. Ohh well, third times a charm, and this time I bought a small 2"x2" perf board from Sparkfun with evenly spaced holes and contacts that passed though the board. Nice!!! Here's the finished product:


I cut out one of the mount holes to help make it fit better. Also I went though a few RGB led's getting them soldered together and fitted behind the tubes. The first set, I accidentally turned one of the led's around and causing three of them to "blow up". The second set I tired something different to help my solder them easier but ended up pulling the pins off and was unable to solder them back. Third times a charm and this time I used a technique used to make RGB LED Cubes. Wrap in heat shrink tubing and here you go:

So I had mentioned that my first Arduino board smoked due to being over volted. Well after that I ordered a "breadboard" power supply from sparkfun that will convert 9-12v to 3-5v. I made a small modification of adding a heat sink to the voltage regulator and painting the super bright red led they had on board with some black model paint I had laying around. Then I wired it up in parallel with a baral jack plug, which I actually didn't need, as there are pins to solder wires directly to the board but whatever. Then since I had wanted to keep the FTDI cable used to program the Arduino, I grabbed a short usb extension cable from my local pc shop and wired it up so I could use the FTDI cable to power the board.

Here's a short video showing the LED back light running with the clock as my finished product.
And heres the code I used. Thanks to the guy over at Tronixstuff for his clock code as well as the guy over at the applied platonics blog for his RGB LED code.
Even with all the problems I had getting this project finalized I really enjoyed working with this project and looking back at some of the stuff I was doing just a few months ago, I can definitely see a improvement in my abilitys.
/*
Nixie tube demonstration code - simple clock
http://tronixstuff.com - John Boxall. February 2011.
Baseon on a sketch originally created by Lionel Haims, July 25, 2008.
Released into the public domain.
*/
#include "Wire.h"
#include "Nixie.h"
#define DS1307_I2C_ADDRESS 0x68
// note the digital pins of the arduino that are connected to the nixie driver
#define dataPin 2 // data line or SER
#define clockPin 3 // clock pin or SCK
#define latchPin 4 // latch pin or RCK
// note the number of digits (nixie tubes) you have (buy more, you need more!)
#define numDigits 4
int narray[numDigits]; // holds the digits to display
int a=0;
// This assumes you're using a RadioShack #276-0028 RGB LED
// 2011-05-12: Note! The anode is the really long pin.
// You'll need to bend it to get it into Digital8.
//
// || || || ||
// || || || ||
// || || || ||
// G B || ||
// || R
// A
// D11 D10 D08 D09
int common_anode = 8;
int red_pin = 9;
int blue_pin = 10;
int green_pin = 11;
int red_min = 150;
int red_max = 255;
int blue_min = 185;
int blue_max = 255;
int green_min = 195;
int green_max = 255;
float h = 0.0;
float s = 1.0;
float v = 0.8;
// Create the Nixie object
// pass in the pin numbers in the correct order
Nixie nixie(dataPin, clockPin, latchPin);
// Convert normal decimal numbers to binary coded decimal
byte decToBcd(byte val)
{
return ( (val/10*16) + (val%10) );
}
// Convert binary coded decimal to normal decimal numbers
byte bcdToDec(byte val)
{
return ( (val/16*10) + (val%16) );
}
void setDateDs1307(byte second, // 0-59
byte minute, // 0-59
byte hour, // 1-23
byte dayOfWeek, // 1-7
byte dayOfMonth, // 1-28/29/30/31
byte month, // 1-12
byte year) // 0-99
{
Wire.beginTransmission(DS1307_I2C_ADDRESS);
Wire.send(0);
Wire.send(decToBcd(second)); // 0 to bit 7 starts the clock
Wire.send(decToBcd(minute));
Wire.send(decToBcd(hour));
Wire.send(decToBcd(dayOfWeek));
Wire.send(decToBcd(dayOfMonth));
Wire.send(decToBcd(month));
Wire.send(decToBcd(year));
Wire.send(0x10); // sends 0x10 (hex) 00010000 (binary) to control register - turns on square wave
Wire.endTransmission();
}
// Gets the date and time from the ds1307
void getDateDs1307(byte *second,
byte *minute,
byte *hour,
byte *dayOfWeek,
byte *dayOfMonth,
byte *month,
byte *year)
{
// Reset the register pointer
Wire.beginTransmission(DS1307_I2C_ADDRESS);
Wire.send(0);
Wire.endTransmission();
Wire.requestFrom(DS1307_I2C_ADDRESS, 7);
// A few of these need masks because certain bits are control bits
*second = bcdToDec(Wire.receive() & 0x7f);
*minute = bcdToDec(Wire.receive());
*hour = bcdToDec(Wire.receive() & 0x3f); // Need to change this if 12 hour am/pm
*dayOfWeek = bcdToDec(Wire.receive());
*dayOfMonth = bcdToDec(Wire.receive());
*month = bcdToDec(Wire.receive());
*year = bcdToDec(Wire.receive());
}
void setup()
{
byte second, minute, hour, dayOfWeek, dayOfMonth, month, year;
pinMode(latchPin, OUTPUT);
pinMode(clockPin, OUTPUT);
pinMode(dataPin, OUTPUT);
Wire.begin();
nixie.clear(numDigits); // clear display
pinMode(common_anode, OUTPUT);
digitalWrite(common_anode, HIGH);
pinMode(red_pin, OUTPUT);
digitalWrite(red_pin, HIGH);
pinMode(green_pin, OUTPUT);
digitalWrite(green_pin, HIGH);
pinMode(blue_pin, OUTPUT);
digitalWrite(blue_pin, HIGH);
Serial.begin(9600);
float h = 0.0;
float s = 1.0;
float v = 0.8;
// Change these values to what you want to set your clock to.
// You probably only want to set your clock once and then remove
// the setDateDs1307 call.
second = 30;
minute = 11;
hour = 17;
dayOfWeek = 3;
dayOfMonth = 11;
month = 5;
year = 11;
//setDateDs1307(second, minute, hour, dayOfWeek, dayOfMonth, month, year);
}
void nixNum(int z)
// displays integer 'z' on 4-digit nixe display
// keeps leading zero, as blank still flickers somewhat
{
narray[0]=int(z/1000); // thousands value
z=z-(narray[0]*1000);
narray[1]=int(z/100); // hundreds value
z=z-(narray[1]*100);
narray[2]=int(z/10); // tens value
narray[3]=z-(narray[2]*10); // ones value
nixie.writeArray( narray, numDigits);
}
void showTime()
{
int zzz=0;
byte second, minute, hour, dayOfWeek, dayOfMonth, month, year;
getDateDs1307(&second, &minute, &hour, &dayOfWeek, &dayOfMonth, &month, &year);
if (bcdToDec(hour)<1) { zzz=minute; } else if (bcdToDec(hour)>=1)
{
zzz=hour*100;
zzz=zzz+minute;
}
nixNum(zzz);
}
void hsv_to_rgb(float h, float s, float v, unsigned char *rc, unsigned char *gc, unsigned char *bc) {
int h_i = ((int)(h/60)) % 6;
float f = (h/60) - (int)(h/60);
float r,g,b;
float p = v * (1.0 - s);
float q = v * (1.0 - f*s);
float t = (1.0 - (1.0 - f)*s);
switch(h_i) {
case 0: r = v; g = t; b = p; break;
case 1: r = q; g = v; b = p; break;
case 2: r = p; g = v; b = t; break;
case 3: r = p; g = q; b = v; break;
case 4: r = t; g = p; b = v; break;
case 5: r = v; g = p; b = q; break;
}
*rc = red_max - (char)((red_max - red_min)*r);
*gc = green_max - (char)((green_max - green_min)*g);
*bc = blue_max - (char)((blue_max - blue_min)*b);
}
//void showDate()
//{
// int zzz=0;
// byte second, minute, hour, dayOfWeek, dayOfMonth, month, year;
// getDateDs1307(&second, &minute, &hour, &dayOfWeek, &dayOfMonth, &month, &year);
// zzz=(dayOfMonth*100)+month;
// nixNum(zzz);
//}
void loop()
{
unsigned char r,g,b;
h += 1;
if (h > 360.0) h -= 360.0;
hsv_to_rgb(h,s,v, &r,&g,&b);
analogWrite(red_pin, r);
analogWrite(green_pin, g);
analogWrite(blue_pin, b);
showTime(); // display the time
delay(100);
//a++;
//if (a==10)
//{
// showDate(); // display the date (day and month) for two seconds
// delay(2000);
// a=1;
//}
}
I have actually already been asked how much it cost to get this going if i were to make another and I figure it would be about $300 for all the parts. And now that I know what I'm doing, it probably wouldn't take me much more then a good day to build it. Also, if you didn't notice, on the first part of these post, I linked a wish list on sparkfun with all the part that I used to make this product with a few more to expand it a little further (add buttons to change the time and turn on/off the back lights) if your interested in building your own. I also work for tips if you like one but don't have the soldering skills to do it yourself. =D
Hey I've got a wedding to fund! LOL!
That's it for now. I think I'm going to take a break for a while while I save up for my wedding so keep it real peeps!


